A Hotchkis Suspension for the G-body is a very easy and effective upgrade! All of the Hotchkis Sport Suspension parts are a “bolt-on” type application and can be performed with simple hand tools in a single afternoon. Yeah, that sounds like a magazine pitch, but guess what, it’s true! Of course there is a learning curve if one has never removed or installed suspension components on the G-body, and there are some major safety precautions one should consider, but a novice can easily and safely perform these tasks! Check out these simple upgrades I am performing to the project HotRodRegal, and decide for yourself if you want to tackle this performance upgrade for your car.

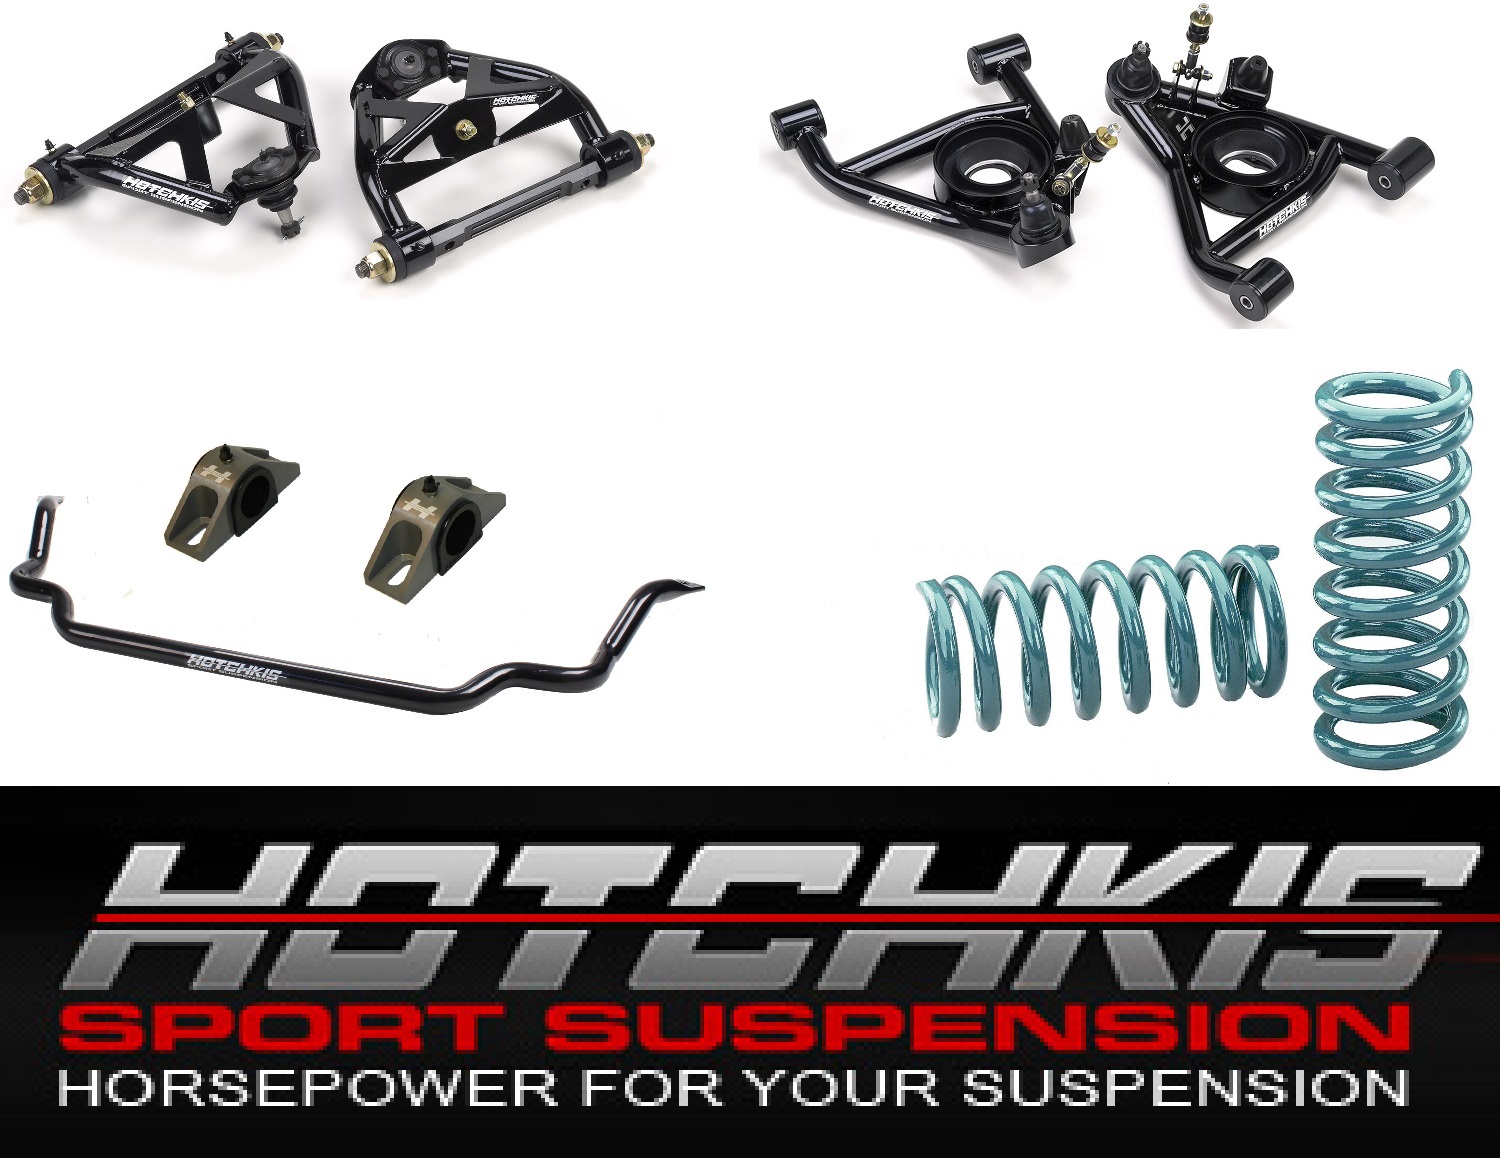
The HotRodRegal has had a couple revisions to the suspension, and like all projects, it keeps getting better. This time around, I have decided to use the Hotchkis Sport Suspension Stage 2 TVS kit for the 1978-1988 G-body. TVS stands for “Total vehicle system” and is designed for street & track duties with reliability in mind. In this article, I will show the installation of the front suspension pieces of the Stage 2 TVS kit. The kit contains the tubular upper a-arms (Part # 1114U), the tubular lower a-arms (Part # 1114L), the front 1 inch lowering springs (Part # 1902F), the front extreme sway bar ( Part# 2201F), and the optional billet sway bar brackets (Part # 23391375). I am using these front suspension parts in conjunction with Hotchkis Sport Suspension rear 2 inch lowering springs (Part # 19114R), lower trailing arms (Part # 1301 ), rear trailing arm mount braces (Part # 1401), the rear air bag kit (Part # 31750), and their extreme rear sway bar (Part # 2281R) to create a balanced suspension (more details on the rear suspension parts and build-up in future posts). These parts will make the G-body (which is already a great car) even better!
Before purchase of any aftermarket part, I strongly suggest that one does their research homework. I based my research on a few things:
- Utility of the vehicle – (What is the overall/primary use of the car? Do I need ride height adjustability? How often am I going to race the car?)
- Is the engineering in the aftermarket parts sufficient for the use of the vehicle? – (Will the design of the parts hold up to daily driving or wear out quicker? What is the ride quality I want? Do I need to constantly adjust the parts? Is the design beyond my current need for the intended driving situation?)
- Cost and Maintainability – (There seems to always be something bigger and better-What is my price point? Can I easily and readily maintain the vehicle after the addition of the aftermarket parts? Ball joints go bad at bad times – can I get a replacement at the local parts store? If I choose a certain aftermarket company, what is the likelihood of the company being around in the future?)
- Feedback from others using the parts – (Perform research on forums such as MalibuRacing.com, TurboBuick.com, MontecarloSS.com, GbodyForum.com, Pro-touring.com, Lateral-G.net, LS1.com and talking to folks with the parts on their cars.)
- Compatibility with other existing parts (Will I have any clearance issues with my current configuration or future improvements – if so what are the work arounds?)
Asking these types of questions will help one narrow down the selection of aftermarket parts / vendors that are a good fit for the project. After asking myself these types of questions, I came to the conclusion that Hotchkis Sport Suspension made sense for my style of intended driving and overall use of the car. Once the major decision of “What to buy” and “Why” is out of the way, it’s time to order it up and install the goodies!

Like any successful operation, the first step is safety! Evaluate your mechanical ability, do your homework on removal and installation procedures (youtube is a great resource), and acquire the necessary safety tools (Jack stands, spring compressors, safety glasses, etc.). Spring removal is possibly the most dangerous process in this entire project (that and the car falling on you)! No matter what, please take your time and be safe. It’s not successful if your seriously hurt and you can’t go play.
Previously, I already had the Hotchkis 1 inch lowering springs in the front and the removal of the previous suspension components came out as easily as they were installed. I had all the original holes in the frame up-sized and reamed to 1/2″ dia. to accommodate the Grade 8 1/2″ dia. hardware. Therefore, I will only be showing the installation portion of the Hotchkis Sport Suspension Stage 2 TVS front pieces in this article. First up, the tubular upper a-arms (Part # 1114U).
As stated, the holes in the frame were up-sized to 1/2″ diameter. Take extra caution if you choose to perform an upgrade such as this because one can off-center the holes and cause issues with bolt alignment. Just so there is no mistake, this is not required for the Hotchkis Sport Suspension Stage 2 TVS kit installation… It’s just something I preferred. All Hotchkis Suspension parts are designed to work with stock hardware (metric), but can be ordered to fit 1/2″ diameter hardware (which is another cool feature in my opinion).
Continuing with the build, the Hotchkis Sport Suspension tubular lower a-arm (Part # 1114L).
The Hotchkis 1 inch lowering spring (Part # 1902F) is much easier to install than a stock spring. Still use caution when compressing the spring in the lower a-arm though, it can still come out under pressure.
If your looking for more information on the spindle and brakes being used on the HotRodRegal check out these past posts: G-body Baer Brakes & Forgeline Motorsports GA-3 .
Now for the larger diameter front extreme sway bar (Part# 2201F). The sway bar is 1 & 3/8″ diameter and can be mounted to traditional sway bar end links (included in the kit) or to the spherical bearing links on the tubular lower a-arms. It has bushings and mounts included with it, but as you will see I upgraded to the billet mounts.
It is important to note, when mixing and matching manufacturers’ parts not everything lines up, or functions like we think they should. This is one of the reasons for sticking with one manufacturer in any suspension upgrade – compatibility. A single aftermarket company will have performed the engineering, fitted and tested their parts. In this case, I have used all Hotchkis Sport Suspension parts in the front, which fit as advertised, but then added the Baer Brakes bump-steer kit (purely an optional upgrade). As stated earlier though, these kinds of things will sneak up on you in your project – “Work arounds”. I did not know or think to account for the larger diameter of the bump-steer tie rod end. Fortunately, as seen in the last video, the Hotchkis Sport Suspension parts have enough adjustment to over come this obstacle. I chose to create a small shim from some aluminum bar stock (cutting it with a band saw), painted it black for aesthetics, and adjusted the swivel sway bar links by rotating them out/up. If you choose to not run a bump-steer kit, then no adjustments are necessary.

The project HotRodRegal now has the Hotchkis Sport Suspension Stage 2 TVS front suspension kit installed . My next operation will be to install a stronger than stock front triangulating frame brace to take full advantage of this upgrade. Once the rear suspension of the car is completed, I will then lower the car back onto the ground. After installation of all the new suspension parts are complete and supporting the weight of the car, the hardware will be final torqued and lubricated. Of course an alignment will need to be performed and the upper a-arms will need shims – but most likely a shop will perform those actions.

I like to customize things just a little (as you probably have seen by now), and share the knowledge. Progress is built over time and on lessons learned. I really enjoy and appreciate when others more experienced share their knowledge on lessons they have learned . Hopefully this website gives you the courage to get rid of those stock parts, increase the strength of your car, and go take some corners!
Keep checking back to see how I install the rear Hotchkis Sport Suspension parts and a more extreme way to install the extreme rear sway bar.
All the Best!
-Matt